Tag Archives: serpentine
Ford Racing Crate Engine Changes to Fit 1994 SN95 Mustang
Changes to the Ford Racing M-6007-X427FRT 427 to Fit a 1994/95 SN95 Mustang
Does a Ford Racing X-Head 427 (M-6007-X427FRT) want to fit into the 1994/95 Mustang SN95 chassis? Hell yes. Does it fit when received from Ford Racing…not hardly. Let’s go through key changes for a Mustang engine swap.
Start with basics. The standard Mustang GT engine was the venerable 302 pushrod V8. You have choices…stroke the 302 up to 347 cubic inches?…stroke up to 363? The next step would be to drop a 351-based engine into the Mustang.
But, Ford had already done this experiment. Versions of the 1995 Mustang Cobra R model had a Ford 351 W dropped in place of the 302. The Cobra R 351 produced only 300 HP, and only 250 units were produced. By, 1996, the 302 and 351 pushrod engines were extinct…end of era. Period.
The Ford Racing X-Head 427 comes in two variants: the front pan FFT and the rear pan FRT. The 351 engine was intended for front sump service, but the SN95 Mustang demands rear sump. It turns out to be a bit academic because neither Ford Racing pan fits the SN95 Mustang.
What else on the Ford Racing crate engine does not fit the SN95? Here goes:
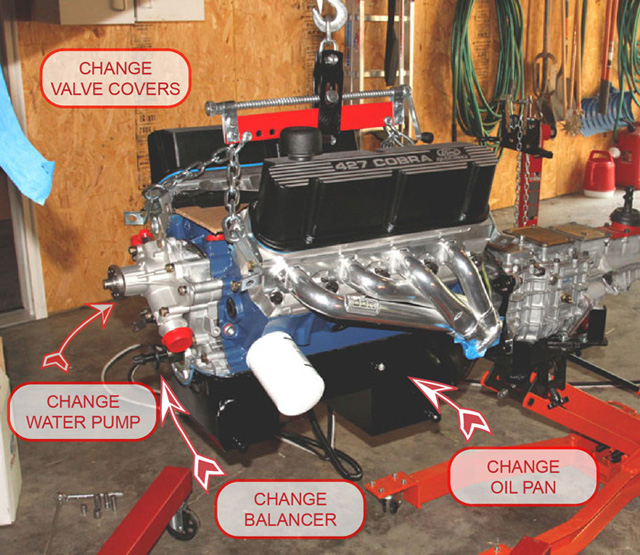
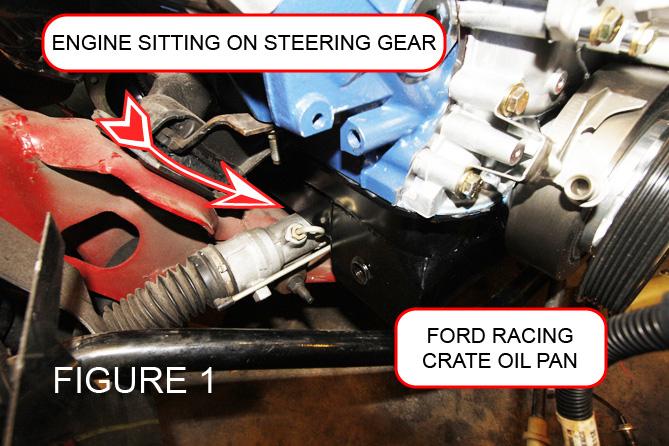
- The oil pan, and consequently, the oil pickup tube that will have to be replaced during the oil pan swap out. Yes, you will find that your engine rests on top of the steering gear (Figure 1, below)…you can either keep it in this condition and eliminate the motor mounts OR you can buy the 5 quart (instead of 7 quart) 351W oil pan from Summit Racing (M-6675-A58), and it will fit quite well. It will give you about 3/8 inch clearance to the steering gear and 3/8 inch clearance to the factory add-on stiffener bars beneath the engine.
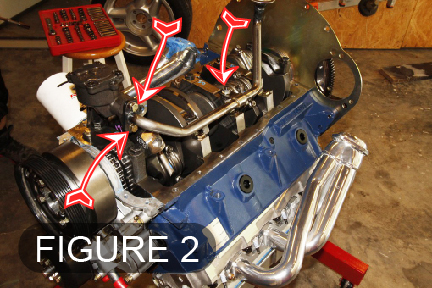
Remember to change the engine oil more frequently. You do not have to be a brain scientist to change out the oil pickup tube…the tube does come with the oil pan. As shown in Figure 2 (below), invert the engine while on the stand; remove the two bolts at the pump, then the one nut on the tube mid-span. The oil pickup that is sent with the M-6675-A58 oil pan fits decently well.
- The valve covers. The Ford Racing crate engine is equipped with the cool-looking cast aluminum black valve covers (M-4582-W427B) shown in the photo above. Put them on eBay. You will eventually find that the Edelbrock Pro-Flo 2 intake manifold and throttle body gives you virtually no room to maneuver a 4 inch diameter intake tube to the passenger’s side firewall…they simply are too tall. You will also eventually find that the back of your alternator slams into the valve because you will be able to re-use your huge right and left cast aluminum accessory mounts…this makes life a whole lot easier. I bought the cool looking Ford Racing M-6582-A302R polished cast aluminum valve covers. The provide plenty of air intake tube clearance as well as room for the alternator. I had the opportunity to use the new-style Fel-Pro PermaDryPlus valve cover gaskets QVS13264T from Summit…a far improvement from the cork gasket/black ooze days. One must remember, however, that the PermaDryPlus gaskets have little tolerance for over-torquing. I found out the hard way that 60 inch-pounds (i.e., 5 ft-lbs) is plenty of torque to seal these gaskets.
- The water pump and timing chain cover. It seems kinda sad to have to rip the whole front off a new Ford Racing crate engine, but this is required. The SN95 Mustangs used an electric fan in place of the conventional belt driven fan. Consequently, the SN95 water pump is a short snout “reverse rotation” water pump. Any of the aftermarket 302/351 water pump and timing chain covers will work well. Perform the timing chain cover change out while you are doing the oil pan change out as the gaskets are much, much easier to handle. You can thank me later. While performing the timing chain cover change out, you will have to remove the mechanical fuel pump eccentric from the end of the cam shaft…this is what make the “short snout” water pump short. If you don’t remove the eccentric, the new timing chain cover will not install. I used the “new style” dry Fel-Pro QOS30214T pan gasket from Summit…great fit…I remember the days of cork gaskets and dope, so this was a treat to deal with. As I am showing my age, I used the Permatex High Tack Spray-A-Gasket sealant on the water pump gaskets. This was some incredibly good stuff to use. I remember the days of black ooze and brushes.
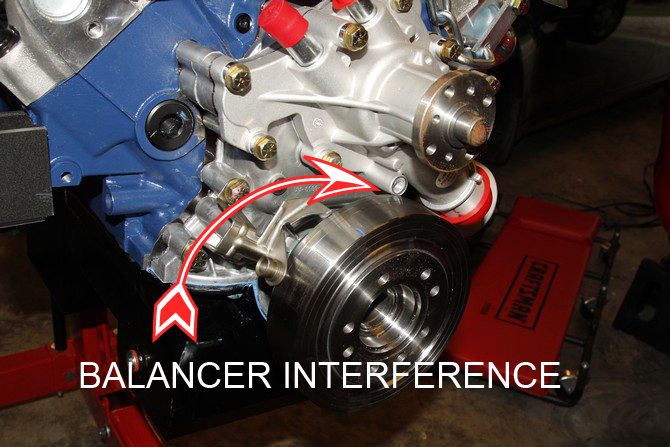
- The harmonic balancer. The Ford racing crate engine comes with an absolutely beautiful polished harmonic balancer. The purpose of the harmonic balancer is to absorb the torsional vibration energy as each cylinder fires. When you pull the harmonic balancer to change the timing chain cover, remove the pretty Ford Racing balancer and put it on Craig’s List…you will have to replace it because it is too large in diameter for the new reverse rotation water pump that you just installed. The scene looks like Figure 3:
The diameter of the Ford Racing 7 inch balancer is too large and strikes a water pump boss. It became a true adventure to replace the harmonic balancer for this engine. Ford had a long history of using multiple Top Dead Center (TDC) markings for their engines with different pointer locations. Keep in mind, when the crankshaft keyway is in the 12 o’clock position and the front right (No. 1) cylinder is at TDC on the compression stroke, you have found true TDC, at least for timing purposes. I tried one balancer that had at least 4 different TDC positions on it. Another had TDC situated 30 degrees away from my TDC pointer. I finally settled on a harmonic balancer from Advance Auto that was made for the 302 engine, and had the proper extension to align the crankshaft pulley to the proper position for the serpentine belt. The balancer had a 28 oz weight affixed to it…this MUST BE REMOVED because the Ford Racing crate engines are ZERO BALANCE engines. In other words, they are balanced internal to the engine, and you cannot use an external weight on either the flywheel nor the harmonic balancer…bad vibration things will happen very quickly at your first firing. The offset weights simply attached to the balancer using two allen screws.


